
Crew Manager was originally developed to accommodate the schedule and coordination of one boat, but some own multiple boats and want to coordinate the schedule and crews using a single site. Here are some tips on how to accommodate multiple boats an owner may have.
- Use a Team Name for the Boat Type and Name – The boat type and name on the subscription are joined to identify the site name and are included on all reminder emails. If you have multiple boats with the same name, leave the boat type blank and use the boat name for the site (e.g. two boats each named Leading Edge would be called Leading Edge). If you have multiple boats with different names, provide a name for the team and use that in the format of “Team” or “Fastboat” for boat type and “Fastboat” or “Racing” for boat name . All messages will be sent using the combination of boat type and boat name (e.g. Fastboat Racing or Team Fastboat).
- Create Tags to Identify Each Boat – The All in One Event Calendar plugin has the ability to use Categories and Tags that allow filtering of events on the calendar. Categories are pre-set to identify the type of events (e.g. One Design, PHRF, IRC, etc.). Tags are not used and available to identify separate boats. For multiple boats with the same name, consider using the boat type for the tag (e.g. J/35 and J/109). Owners having multiple boats with different names may include tags with the boat name and type (e.g. IC37 Dragon, Etchells 291 and Sunfish 5955).
- Setup Tags – One time setup
- Log in to your own Crew Manager site as the Skipper if you have multiple logins.
- Once logged in mouse over Skipper on the menu and click on WordPress Admin.
- The WordPress Admin screen will load. On the left side menu, mouse over Events and click on Organize.
- The AI1EC plugin Organize Events screen will open – at the top is Categories and Tags. Click on Tags.
- Below Add New Tag type the desired tag name In the Name box (e.g. IC37 Dragon). The Slug will be generated automatically when saved. The optional description is used in pop-ups and may be left blank, or a short description entered as information when the page is opened.
- Scroll down and click the blue Add New Tag button.
- Repeat and add additional tags for each boat as desired
Tags may now be selected on each event to identify the boat used for an event. If there are multiple events and boats where it might be confusing to discriminate which boat, the boat name and or type may be typed in with the event name as an easy discriminator (e.g. C&C30 – Conanicut ATI Race would be entered in the Event Title box)
- Assigning a Tag for an Event – Method 1: Annual Calendar using Skipper View.
- On the main menu click logged in as Skipper on Calendar, then click the Skipper View radio button. The screen refreshes with the current year events. You may select other years and use the optional filters.
- Columns in the center display categories and tags for each event. You may individually check or uncheck the desired Tag for the boat to be scheduled for an events
- Multiple event changes may be saved by clicking the Skipper Update button. Events may also be deleted by clicking the Delete Event checkbox, then clicking the Skipper Update button.
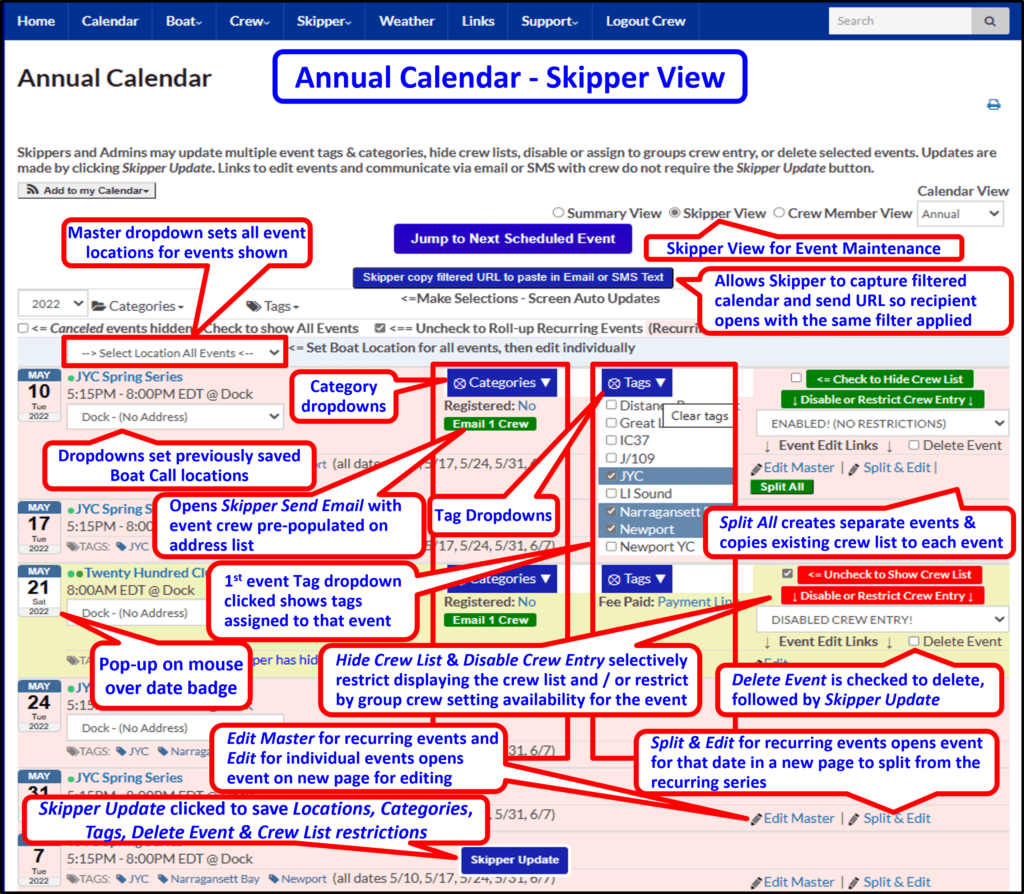
Annual Calendar – Skipper View (Desktop)
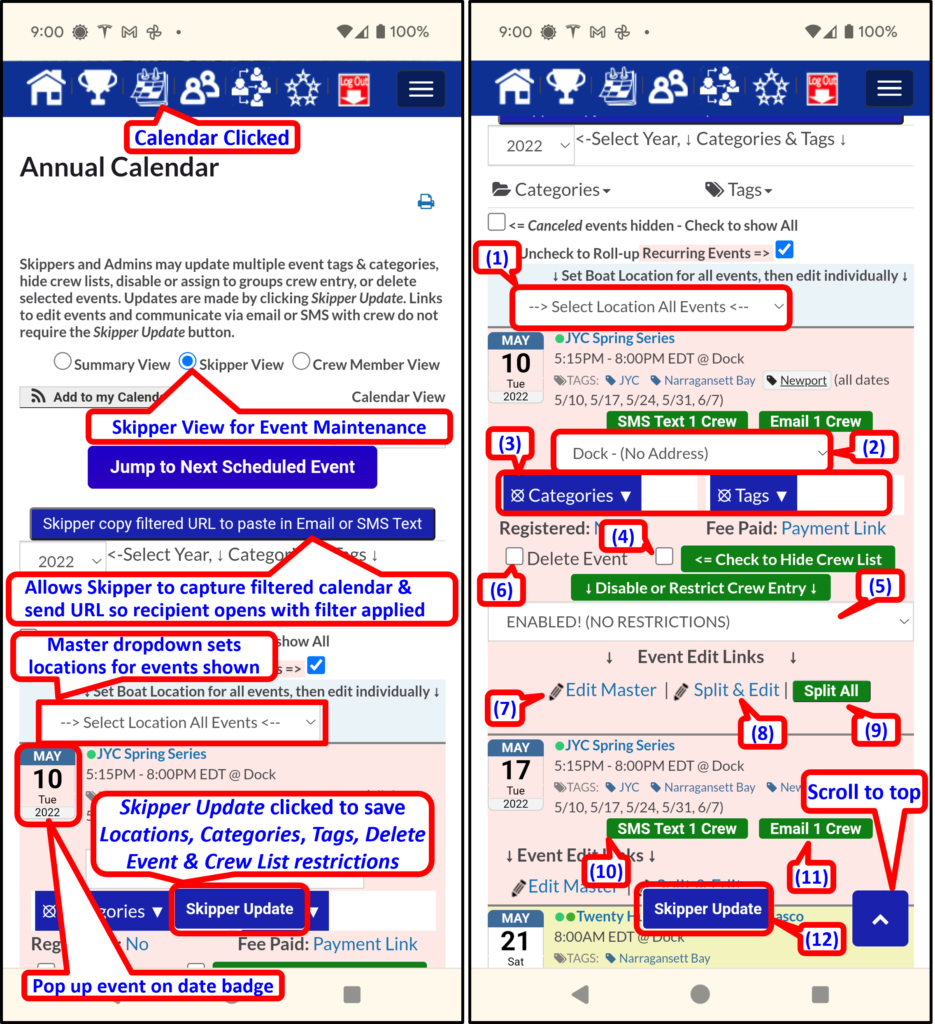
Annual Calendar – Skipper View (Phone)
- Assigning a Tag for an Event – Method 2: Assumes you are creating or editing an existing event.
- On the right side of the Add New Event screen is a section labeled Tags – Click on the link below that titled Choose from the most used tags
- Click on the desired tag from the list that is displayed
- The event may be saved by scrolling to the top and clicking the Publish button. Once the event is saved, the event may be edited further. The Publish button changes to an Update button. The event may also be deleted by clicking the Move to Trash link to the left of the Update button.
Using Tags to Filter Calendar Events for a Single Boat – The calendar and various Crew Manager pages may be filtered to display only selected tags or all tags (default setting). The steps below allow anyone viewing the site to view filtered Events by tag on the Calendar
- Click Calendar or any of the Crew Manager pages under Crew or Skipper that display events on the top menu
- When the page opens Categories and Tags are displayed at the top. Mouse over Tags and click on the desired tag or tags you want to display. The Calendar will update to show only the selected tags.
- Clicking the ⦻ symbol on the Tag dropdown clears the selections to display all events and the screen auto updates.