
All calendar events have the ability to add custom fields. Crew Manager uses these for Uniform (e.g. what color shirts to wear), Registered (Yes – the boat has registered for the event) and Fees Paid (Yes, Paid, or a date when the fees are due). After the event, the entry may be updated with the finish (1 of 7 or 1st) and a link to the finish results. It also allows entry of a series finish (2 of 7) and a link for the series results. Additional custom fields have been pre-named for Notice of Race, Sailing Instructions, Scratch Sheet,
Race Tracker, Safety Check List, Waiver Form, and Waiver Status. Additional fields may be created as desired by the Skipper. Custom fields with a value saved will display whenever the event is opened, and will be included in all event notification emails.
The description below assumes the Skipper is already creating or editing an existing event. Custom Fields are located below the text block area.
-
- Custom Fields: Click the arrow on the Select dropdown, then click uniform. In the Value field type White Shirts, then click the Add Custom Field button. The Skipper may add new custom fields that may be displayed on any event. A link may be inserted in the Value field. If a link is inserted the field Name is displayed as a clickable link that opens in a new page (e.g. Name as “Notice of Race” with a link in Value displays Notice of Race as a link that may be clicked for that event).
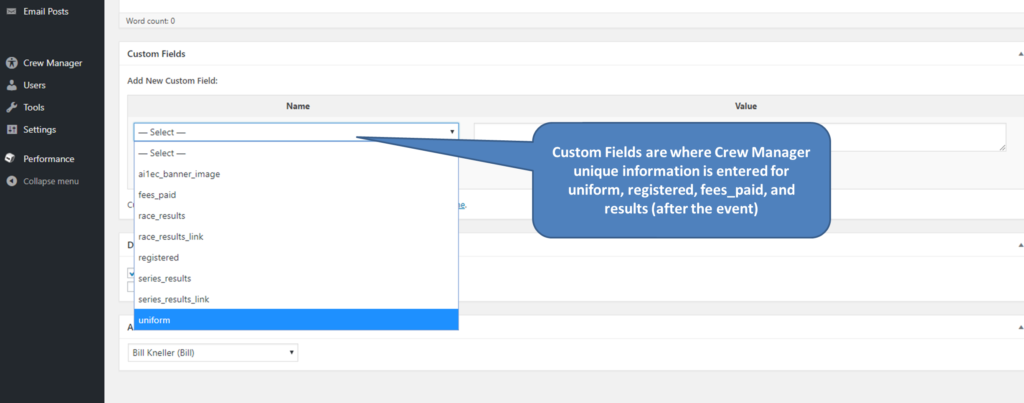
- There are pre-defined fields labeled registered and fees_paid. The first is used to indicate when the Skipper has registered for an event by entering “Yes”. The fees_paid field may include a date in m/d/y format along with text. Something such as “Payment due 7/23/2019”. In addition to these fields, the Skipper may enter URLs in the format http://…. or https://…. in the Value field for NOR, SI, Scratch Sheet, or any defined field name. The Event Website URL may be entered in the Organizer & Contact section for the event.
The payment URL such as the Yachtscoring Link may be put in the Event Cost & Tickets section by selecting External Tickets and entering the link in the field labeled Tickets URL. The custom field Payment Link may be used interchangeably with the Tickets URL. A link posted in either location works the same.
Crew Manager automatically creates links associated with the regatta such as the Notice Board, Scratch Sheet, Race Results, etc. when the regatta link for Yachtscoring, Nextsailor, Regatta Network or Jibeset.net is saved in the Payment or Events Tickets URL text box. These automatically generated links are based on extracting a unique regatta ID from the format in the regatta link the vendors use. The format for each vendor’s link to be typed in the text box is as follows where #### is a multi digit number the vendor has assigned for a specific regatta.
- Yachtscoring : https://yachtscoring.com/emenu.cfm?eID=#####
- Nextsailor: https://www.nextsailor.com/app/page/regatta/### or http://www.nextsailor.com/regatta/####
- Regatta Network: https://www.regattanetwork.com/event/#####
- Jibeset.net: https://www.jibeset.net/%%%%000.php?RG=########## (%%%% is the Club ID)
When the URLs are entered for the event and payment the Regatta Registration Status report will display links to easily access the target locations. An automatic email reminder is sent daily to the Skipper starting 5 days prior to the payment due date listed. When payment is made, the fees_paid field should be updated to include the word “paid” or “Yes” so that reminders will not be sent. Reminders will not be sent after the event.
- Create a new custom field by clicking on Enter New located below the custom fields dropdown.
- Type the desired name for the custom field in the blank space that opens.
- Type the value for the custom field in the blank field under Value.
- Click the Add Custom Field button located below the new custom field name.
- Repeat steps 3 – 5 as necessary, then proceed to the next step to save the event.
- The event may be saved by scrolling to the top and clicking the Publish button. Once the event is saved, the event may be edited further. The Publish button changes to an Update button. The event may also be deleted by clicking the Move to Trash link to the left of the Update button.
- Custom Fields: Click the arrow on the Select dropdown, then click uniform. In the Value field type White Shirts, then click the Add Custom Field button. The Skipper may add new custom fields that may be displayed on any event. A link may be inserted in the Value field. If a link is inserted the field Name is displayed as a clickable link that opens in a new page (e.g. Name as “Notice of Race” with a link in Value displays Notice of Race as a link that may be clicked for that event).