
Crew Manager provides the ability to assign people to four predefined groups, plus additional named groups the Skipper may define.
- Retired – group is removed from the crew roster display, and the crew dropdowns when assigning positions. The users still have accounts and may log in.
- Core Crew – receives special email messages sent by the Skipper from Skipper Send Email on the Skipper This is a handy to easily contact a select crew group.
- All Posts – new posts published and related post comments submitted are emailed to this group.
Note: Initially the Skipper will want to include everyone in the All Posts group so it may be used to send the site welcome message with login instructions. - Show Crew – only displayed if Hide Crew on Calendar, Availability & Assignments is set to Enables the person checked to be displayed on the Calendar, Crew Availability and Crew Assignments lists. The Skipper may want to check Show Crew for their own name to be visible for all crew to see.
Custom group names may be defined by the Skipper on the same page where Crew are assigned to groups. These custom group name will appear in the To: dropdown on the Skipper Send Email page. The groups may also be selected to restrict setting availability for an event to a particular group. There section at the top of the screen allows the Skipper to add, delete and change Custom Groups. Once added, the groups appear in a column with check boxes by each crew so they may be selectively added to the group. The picture below shows the screen with sections annotated.
Update email distribution as crew members are added, or crew members are no longer active. Crew who join for only one or two events may be added as users without checking All Posts. This allows them to receive event reminders and results for events crewed but won’t receive posts that are published. Check Retired to remove them from the dropdowns when no longer needed. Crew scheduled for an event will always receive email notifications for the event, no matter what group assigned to.
-
- If already logged in and in the WordPress Admin screen, proceed to step 4.
- Log in to your Crew Manager site as the Skipper if you have multiple logins. The Skipper menu will appear in the menu bar.
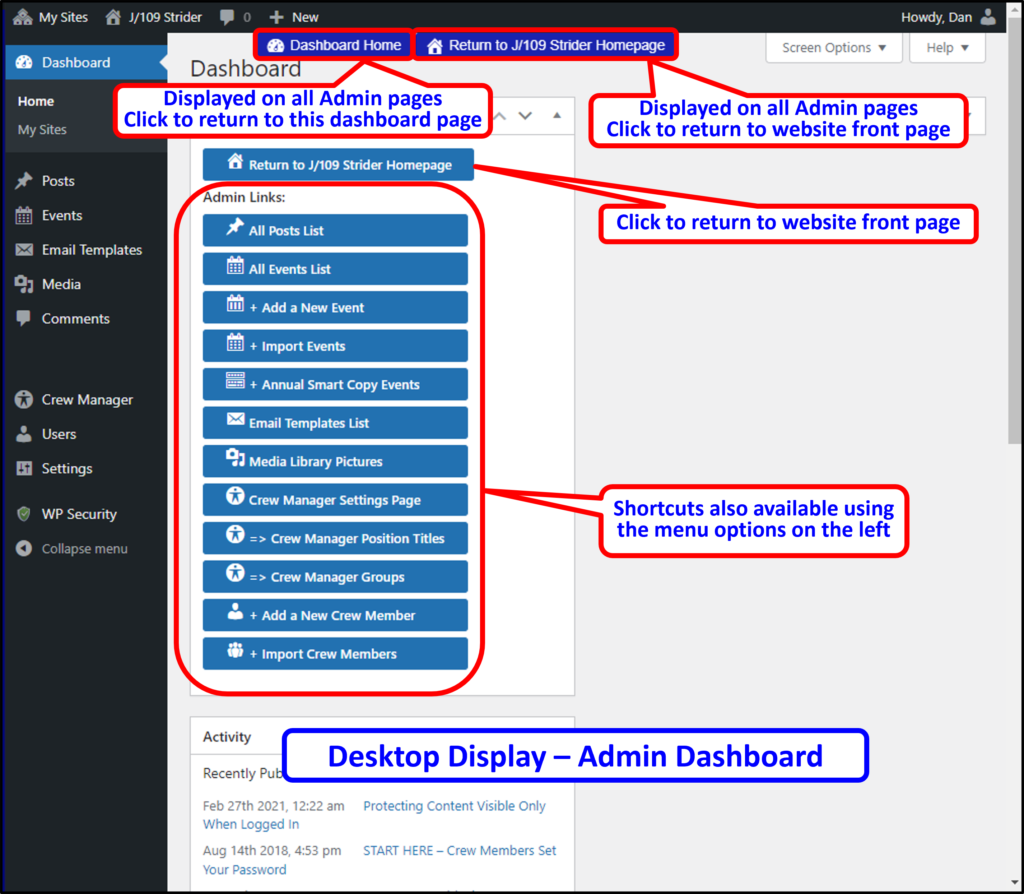
- The WordPress Admin screen will load. The Admin dashboard is displayed. You may click on the dashboard button => Crew Manager Groups or on the left side menu, mouse over Crew Manager and click on Manage Groups.
- The following page opens:

- Custom groups are defined in the upper section. The Skipper may add, delete and change Custom Groups, then click the blue Update Custom Group Names button to save the changes. Once added, the groups appear in the section at the bottom with a column having check boxes by each crew so they may be selectively added to the group. The picture above shows this annotated with blue lines.
- The Retired, Core Crew and Custom Group views may be toggled to display all in or all not in the group. This is helpful to verify the correct assignment of crew to a group was made so that an individual wasn’t inadvertently missed or an individual who is not supposed to be in the group is there. The individual check boxes for each individual may be changed in either view, then once Update Groups is clicked, the screen will update with the changes.
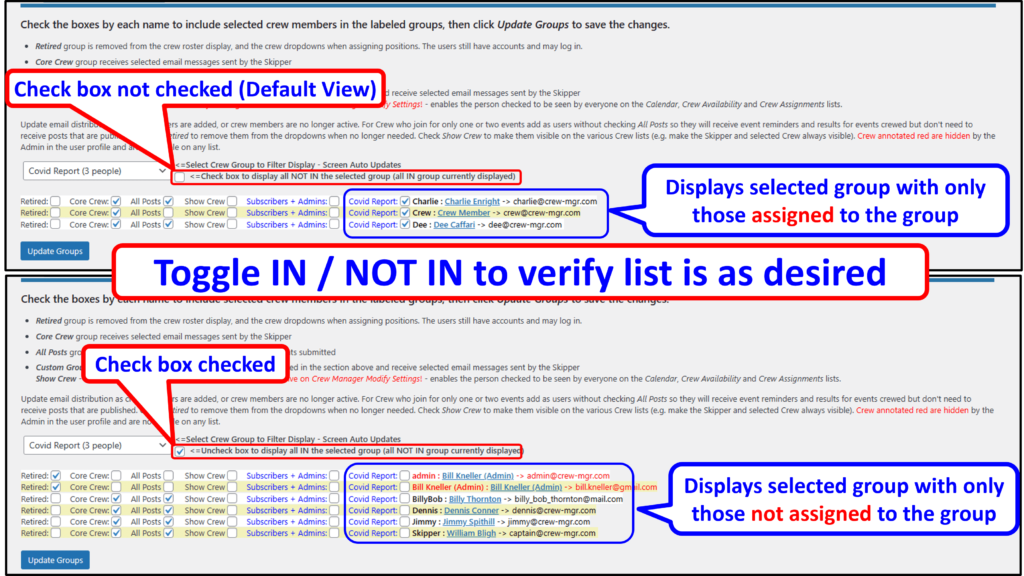
- A crew member list is displayed in alphabetical order preceded by various groups with check boxes. Each crew member is listed as a link that when clicked opens that users profile in a new page. Note the Show Crew group (annotated with red lines above) is only displayed when the Hide Crew option is selected in Crew Manager Modify Settings. This allows selected users to be always visible on the Calendar, Crew Availability and Crew Assignments lists when the Hide Crew option is selected in Crew Manager Modify Settings.
- Assignments to each group may be made by checking or unchecking the group boxes for each person as desired.
- When assignments are complete, click the blue Update Groups button at the bottom to save the updates.