
Import Events from Any Crew Manager Site
The Crew Manager main site and other subscriber sites include events that may be of interest to Crew Manager subscribers. Crew Manager subscribers may easily copy these events to their own site. No crew information is imported, only selected events along with the description box and custom fields . Importing events from the Crew Manager main site has the benefit that custom fields used for items such as the NOR, Scratch Sheet, SI, etc. are updated periodically on the main site. Updates are also made for information in the event Event Payment / Tickets Information and the Club or Organizing Authority fields. These updates are automatically updated on any site where the event was imported. This also occurs if you import an event from any site. If the original site owner updates the event special fields, payment or organizing authority information, these will automatically be updated on the site where the event was imported to. The following describes how to import events from any Crew Manager site.
- Log in as Skipper on the website where events are to be imported
- Mouse over Skipper on the menu and click on WordPress Admin
- On the left side WordPress Admin menu, mouse over Crew Manager and click on Import Events
- The importer page opens with the upper section for spreadsheet import and the lower section defaults to the Crew Manager Master Site with a dropdown selector and a year dropdown selector to import other site events. The dropdown for Year is limited to 3 years in the future. Directions are provided at the top of the event table.
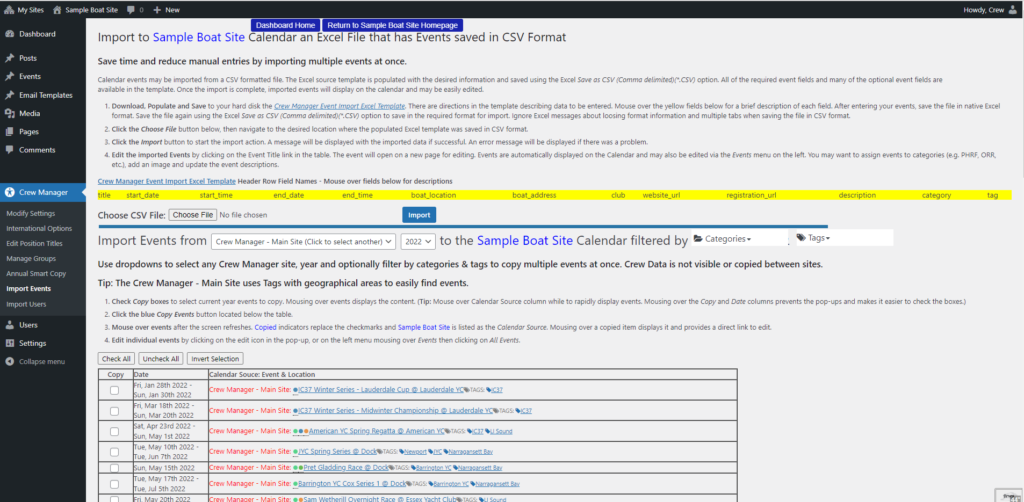
- You may filter the site being viewed by year, categories and tags using the dropdowns on the line having the title of the site in blue (e.g. Sample Boat Site above). This is helpful for the main Crew Manager site where tags are used to group events in geographical areas.
- Check Copy boxes to select events to copy. Mousing over events displays the content. (Tip: Mouse over right half of row while mousing down the screen to rapidly display events. Mousing over the Copy and Date columns prevents the pop-ups and makes it easier to check the boxes.)
- Click the blue Copy Events button located below the table.
- A message indicating successful copy with a table showing the copied events is displayed.
- Mouse over events after the screen refreshes. Copied indicators replace the checkmarks and your Boat Name is listed as the Calendar Source. Mousing over a copied item displays the copied item and provides a direct link to edit.
- Edit individual events by clicking on the edit icon in the pop-up, or on the left menu mousing over Events then clicking on All Events, or by clicking on the Event Title link in the table. The event will open on a new page for editing. Events are automatically displayed on the Calendar. You have the ability to assign the events to categories (e.g. PHRF, ORR, etc.), change or add an image and update the event descriptions.
- Events copied are linked to the original event so that any custom field updates on the original event (e.g. an Amendment to the NOR is posted) are automatically pushed to the copied event. Race results are excluded from these updates. Below shows the custom field added with the link protocol back to the original event.
![]()
Enter Individual Calendar Events
Assuming you are already logged in as the Skipper, do the following to create a new calendar event. In the example below, sample text is used to illustrate an entry.
- On the left side menu, mouse over Events and click Add New. The Add New Event page opens.

- Enter Add Title (Title Here): JYC Spring Race #1. Note: The title is a mandatory field.
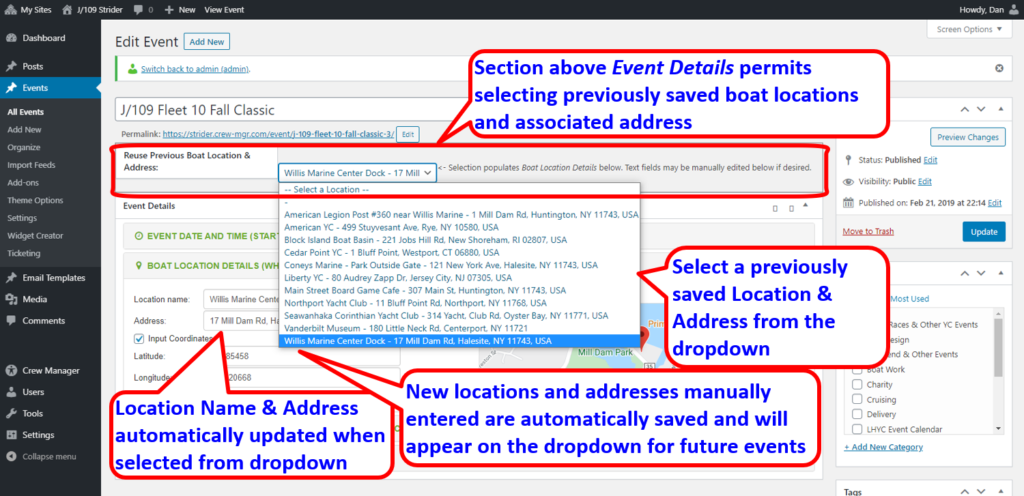
- If there is an event saved with a previous boat location use the Select a Location dropdown to choose the location. Otherwise a new location may be added in a subsequent step.
- Event Date and Time: Click date chooser and select May 8, 2018 and the time 5:15pm (time to be at the boat). Note: The date is a mandatory field and time is recommended, or it will show boat call at midnight.
- Event Date and Time: Check No end time or use the date chooser to select a day and time.
- Repeat: Use the Repeat checkbox to make your event recurrent. You can choose from “Daily”, “Weekly”, “Monthly” and “Custom” recurrence. The “Custom” recurrence allows you to choose individual dates for that event. If you choose one of the first 4 recurrence types, you will also have the option to “Exclude” certain dates. Exclude has exact same recurrence types as Repeat but the opposite action. For example you can choose to “Repeat” a “Weekly” event on Monday, but to “Exclude” “Monthly” the first Monday of the month and the Christmas Monday, using “Custom”. Note: You should include as much information as possible for repeating events before splitting into individual events to minimize the number of edits required. Refer to Splitting a Repeating Event into Single Events for more information.
- Click on Boat Location Details to expand the block if a previous boat location was not selected: Navy Marina in Location Name. For away locations, consider entering the complete address since it is included in the crew reminders.
- Click on Event Payment / Tickets to expand block: leave blank or fill in the external payment link. It is a good place to put the Yachtscoring link for an event. Crew Manager automatically creates links associated with the regatta such as the Notice Board, Scratch Sheet, Race Results, etc. when the regatta link for Yachtscoring, Nextsailor, Regatta Network or Jibeset.net is saved in the Payment or Events Tickets URL text box. These automatically generated links are based on extracting a unique regatta ID from the format in the regatta link the vendors use. The format for each vendor’s link to be typed in the text box is as follows where #### is a multi digit number the vendor has assigned for a specific regatta.
- Yachtscoring : https://yachtscoring.com/emenu.cfm?eID=#####
- Nextsailor: https://www.nextsailor.com/app/page/regatta/### or http://www.nextsailor.com/regatta/####
- Regatta Network: https://www.regattanetwork.com/event/#####
- Jibeset.net: https://www.jibeset.net/%%%%000.php?RG=########## (%%%% is the Club ID)

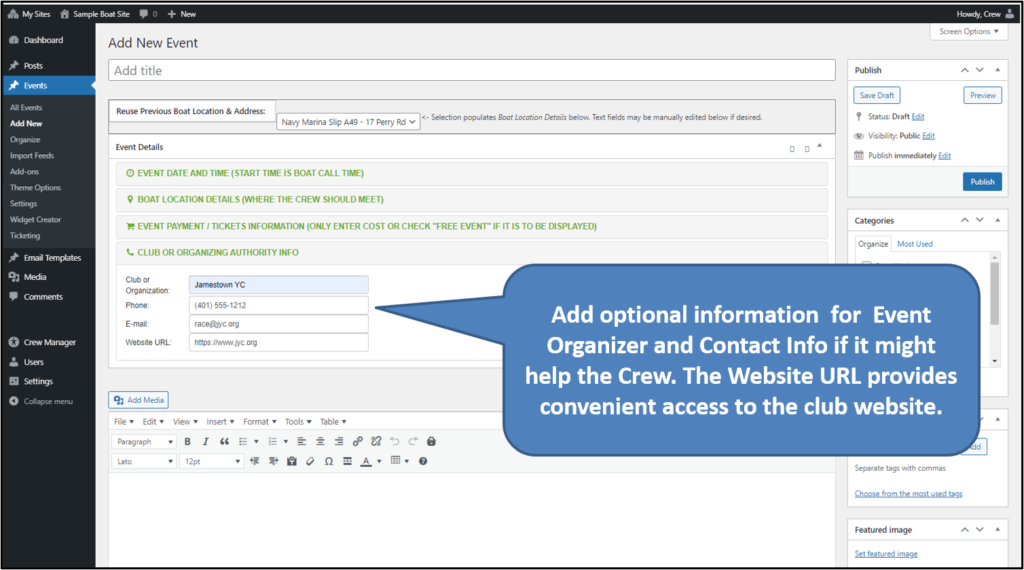
- Click on Club or Organizing Authority Info to expand block: Leave blank or fill in info if it would help the crew and include the club or event website link.
- Text Area for Details: Type free form text with any information that might help the crew. Tides and currents expected, special directions about prepping the boat, links to race documents, etc. Note there are tabs at the top right of the box labeled visual and text. Text is basic and allows raw html editing. Visual provides an editing toolbar. The toolbar provides text formatting icons. A Private icon on the toolbar inserts the tag pair [private] [/private]. Any content between these tags will only be visible to users who are logged in.
- Disable / Hide Crew List: This checkbox provides the option to hide an single event crew list and a separate option to select groups allowed to set availability for that event. Checking the Hide Crew box will remove the crew list from display in popups, the individual event, Calendar, Availability and Assignment pages. Selecting a group in the Restrict Entry box limits setting availability on the individual event, Availability, Assignments, and Calendar menu items. The Skipper will still be able to change crew availability and assignments using the menu items Edit Assignments by Crew and Edit Assignments by Event. This dropdown may be selected when initially creating the event and changed at a later date.

- Categories: Check which category this event is (PHRF, One Design, Delivery, etc.). Multiple categories may be selected. These may be used to filter events by categories on various pages.
- Tags: Assign and select the boat name and / or type if the Skipper has multiple boats. Multiple tags may be selected. These may be used to filter events by tags on various pages.
- Featured Image: Click on Set Featured Image to open the media library. If the image is not in the library, it may be uploaded. This provides a nice calendar pop up feature.
- Custom Fields: Click the arrow on the Select dropdown, then click uniform. In the Value field type White Shirts, then click the Add Custom Field button. The Skipper may add new custom fields that may be displayed on any event. A link may be inserted in the Value field. If a link is inserted the field Name is displayed as a clickable link that opens in a new page (e.g. Name as “Notice of Race” with a link in Value displays Notice of Race as a link that may be clicked for that event).
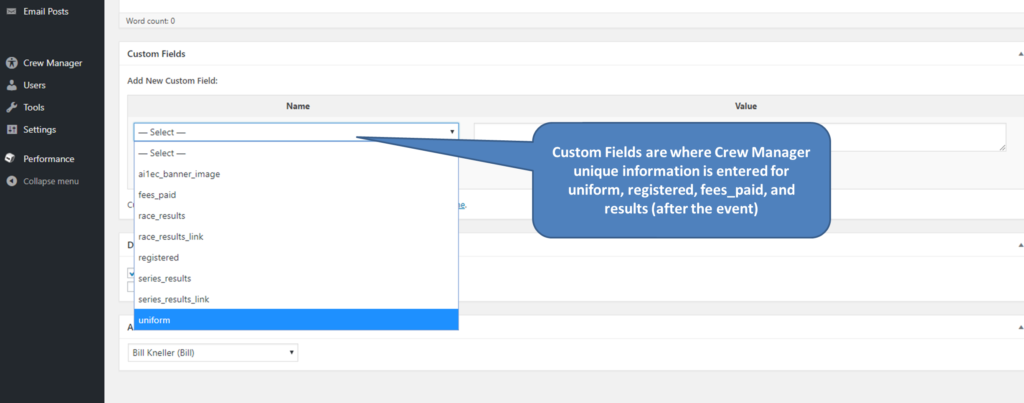
- There are pre-defined fields labeled registered and fees_paid. The first is used to indicate when the Skipper has registered for an event by entering “Yes”. The fees_paid field may include a date in m/d/y format along with text. Something such as “Payment due 7/23/2019”. In addition to these fields, the Skipper may enter URLs in the format http://…. or https://…. in the Value field for NOR, SI, Scratch Sheet, or any defined field name. The Event Website URL may be entered in the Organizer & Contact section for the event. The payment URL such as the Yachtscoring Link may be put in the Event Cost & Tickets section by selecting External Tickets and entering the link in the field labeled Tickets URL. The custom field Payment Link may be used interchangeably with the Tickets URL. A link posted in either location works the same. When the URLs are entered for the event and payment the Regatta Registration Status report will display links to easily access the target locations. An automatic email reminder is sent daily to the Skipper starting 5 days prior to the payment due date listed. When payment is made, the fees_paid field should be updated to include the word “paid” or “Yes” so that reminders will not be sent. Reminders will not be sent after the event.
- The event may be saved by scrolling to the top and clicking the blue Publish button. Once the event is saved, the event may be edited further. The Publish button changes to an Update button. The event may also be deleted by clicking the Move to Trash link left of the Update button.