
The default settings for Crew Manager are set and saved from this menu. The first time the Skipper logs in to Crew Manager, this screen should be accessed and reviewed, enter any changes desired, and save the settings. This is a one time action that is only needed again should any of the setting options require change.
- Log in to your Crew Manager site as the Skipper if you have multiple logins. The Skipper menu will appear in the menu bar.
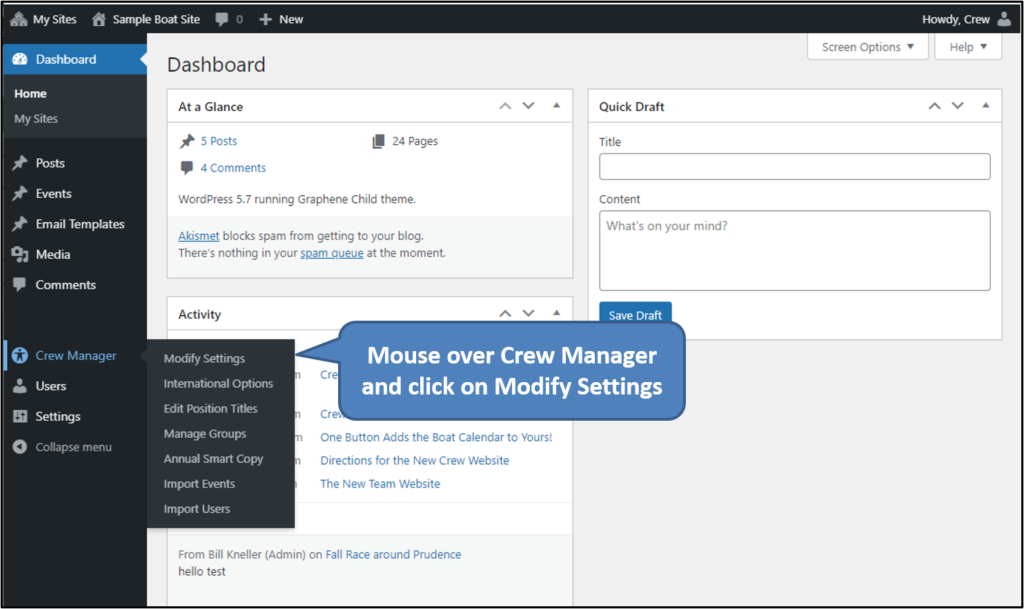
- Once logged in mouse over Skipper on the menu and click on WordPress Admin
- The WordPress Admin screen will load. The Admin dashboard is displayed. You may click on the dashboard button Crew Manager Settings Page or on the left side menu, mouse over Crew Manager and click on Modify Settings.

 This opens the Crew Manager Admin Setup page where all of the default settings for Crew Manager may be modified. Various Crew Manager Admin Setup tabs are located across the top in addition to the same menu options at the left to make navigation easier. The page is shown below followed by an explanation of the settings that may be modified.
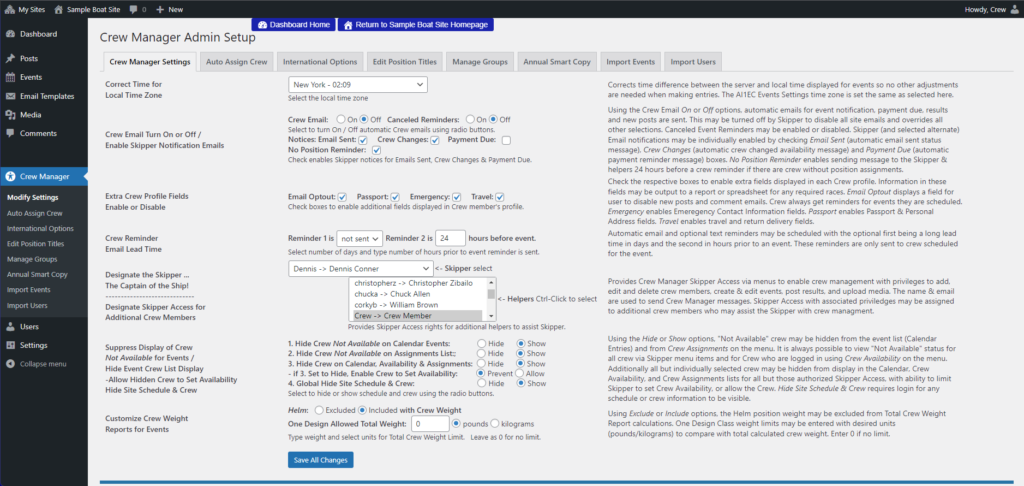
- Correct Time for Local Time Zone: Select the default time zone from the drop down if not New York. The program automatically compensates for the shift between daylight savings and standard time for those time zones that change. The time zone selected provides the base setting for the clock display on each website’s desktop header. The AI1EC Events Settings time zone is automatically set with the same time zone selected. Note that this setting provides the default time zone used when entering an event. The time zone for any event may be set as desired which is helpful if an event occurs or spans a time zone different from the default time zone. All automatic event reminders are sent at the proper time, no matter what base time zone is selected. The time zone identifier as set for a particular event is annotated on the automatic event reminders and displayed on the event.
- Crew Email Turn On or Off / Suppress Skipper Notification Email: Using the Crew Email On or Off options, automatic emails for event notification, payment due, results and new posts are sent. This may be turned off by Skipper to disable all site emails and overrides all other selections. Canceled Event Reminders may be enabled or disabled. Skipper (and selected alternate) Email notifications may be individually enabled by checking Email Sent (automatic email sent status message), Crew Changes (automatic crew changed availability message), Payment Due (automatic payment reminder message), No Position Reminder (Reminds Skipper to assign crew to positions) boxes.
- Extra Crew Profile Fields Enable or Disable: This allows the Skipper to enable extra fields to be displayed on each Crew profile by checking a checkbox. The fields are: Email Optout where crew members may opt out of receiving All Posts and comments emails. Event reminders will always be sent no matter what Optout setting is used. Passport enables fields to input passport information and home address. Emergency enables fields to enter information for an emergency contact person. Travel enables fields to capture destination arrival & departure dates, accommodations, and travel mode back (e.g. Boat Delivery or Other Transportation).
- Crew Reminder Email Lead Time: Automatic email and optional text reminders may be scheduled with the optional first being a long lead time in days and the second in hours prior to an event. These reminders are only sent to crew scheduled for the event. Select number of days and type number of hours prior to event reminder is sent
- Designate the Skipper… The Captain of the Ship!: Using the drop down select the Skipper. The Skipper gets access to all the Skipper screens and can manage Crew assignments. All emails sent to the Crew by default appear from the Skipper’s email address. A dropdown in Skipper Send Email is available to select from any of the other site admins.
- Designate Skipper Access for an Additional Crew Members: Using the drop down with Ctrl-Click select additional Crew members who will have Skipper access, if desired. These individuals get access to all the Skipper screens and can manage Crew assignments the same as the Skipper.
- Suppress Display of Crew Not Available for Events: Using the Hide or Show options, “Not Available” crew may be hidden from the event list (Calendar Entries) and from Crew Assignments on the menu. The default setting keeps “Not Available” Crew hidden. It is always possible to view “Not Available” status for all crew via Skipper menu items and for Crew who are logged in using Crew Availability on the menu.
Hide Event Crew List Display (Enables “Closed Visibility”): Using the Hide or Show options, crew may be hidden from display on event lists (Calendar Entries), Crew Availability and Crew Assignments lists. Crew marked in the Show Crew group will always display even if the hide crew option is selected. The default setting is Show which is the “open visibility” model. Set to Hide for the “closed visibility” model.
Allow Hidden Crew to Set Availability: Using the Allow or Prevent options, crew may be permitted to set their own availability on event lists (Calendar Entries), Crew Availability and Crew Assignments lists. The default setting is Prevent which has no effect unless Hide Event Crew to Set Availability is set to Hide enabling “closed visibility”. If “closed visibility” is used with this set to Prevent, the Skipper must enter availability for all crew members.
Hide Site Schedule & Crew: Using the Hidden and Visible options, the site may be setup so that all schedule and crew information is hidden and only visible to logged in crew members. The default setting is Visible. This displays the event calendar and show crew members using only the display name set in their profile. All other crew information is only visible when logged in.

- Customize Crew Weight Reports for Events: Using Exclude or Include options, the Helm position weight may be excluded from Total Crew Weight Report calculations. One Design Class weight limits may be entered with desired units (pounds/kilograms) to compare with total calculated crew weight. Enter 0 if no limit.
- Automatically Generate Menu: This option is only visible on a separate Admin Setup Tab to users with administrative access (not the default for Skippers). This allows website customization with additional menu pages. Leave this On if no custom pages are used. Turn Off with custom pages. A menu must be built manually using the WordPress menu settings.
- When all the settings are as desired, click the blue button at the bottom labeled Save All Changes.
Enable / Disable Automatically Assign Crew to Positions
When enabled by the Skipper, Crew may be automatically assigned to a position when they initially set their availability for an event.
The auto assign crew feature is available on all sites but defaults to disabled (no auto assignments). When enabled, anytime a crew member sets their initial availability to Yes or Maybe, they will be automatically assigned the position Crew, or any position the Skipper may set for an individual. It is also possible to select Do Not Auto Assign for any crew member. The auto assignment only occurs the first time a crew member sets availability for a particular event.
- Click the tab labeled Auto Assign Crew located near the top center of the Crew Manager Admin Setup page
- By default the Disable radio button is selected. Disable means that Crew will not be automatically assigned to a position when they initially set availability for an event. The context sensitive directions are provided on the the right side.
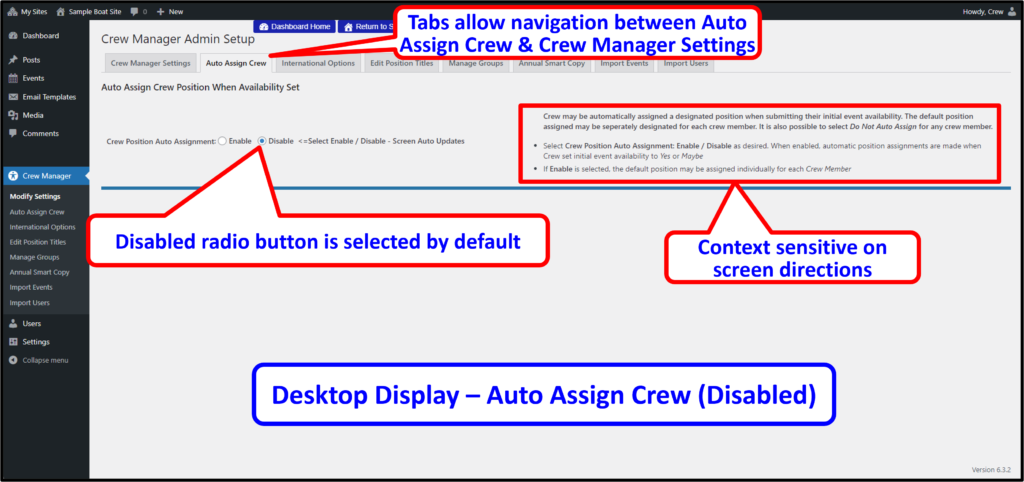
- Clicking the Enable radio button changes the setting and displays a Crew list with default position dropdowns. These dropdowns may be individually selected to choose the default auto assigned position for that individual. The position Do Not Auto Assign may be selected for any individual to prevent auto assignment.

- When all selections have been made, click the blue Update Auto Assign Crew button to save the changes.