Why Import Events?
- Less typing! Many popular events have already been entered with the host yacht club and organizing authority information.
- Automatic update on your sites when the organizing authority posts race documents, notices, scratch sheets and make announcements. Relevant links display on your sites. These are automatically updated daily with no additional effort required, provided the organizing authority uses a regatta management site recognized by Crew Manager. Currently these are Jibeset.net, Nextsailor, Regatta Network and Yachtscoring.
- Events on the master calendar are annotated with event or organizing authority logos that are automatically displayed on the imported events
- Events copied may be edited and customized for the boat. Skippers may easily adjust boat call locations, times, and may update the descriptions as desired.
Import the Events
This procedure assumes the Skipper (or a helper designated by the Skipper) is logged in. While this process may be done on a phone, a desktop display is better suited for this task since the limited screen real estate on a mobile device requires a significant amount of scrolling.
- On the menu mouse over Skipper and click on WordPress Admin to display the Admin screen with the blue menu bar.
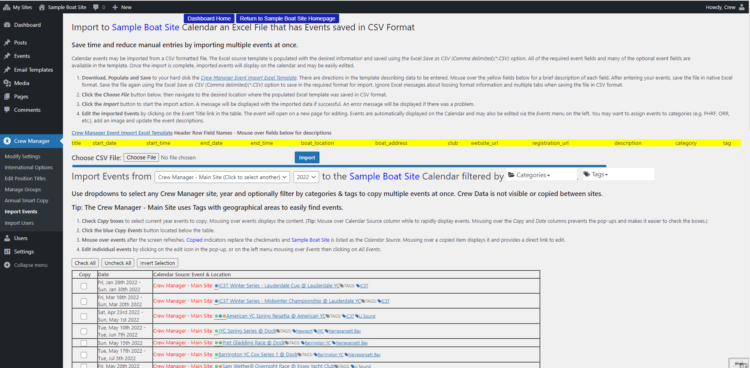
- Click the menu bar with a mini calendar icon + Import Events. After a few seconds the Import Events screen is displayed. The lower portion of the screen is labeled Import Events From followed by a dropdown that defaults to the Crew Manager Main Site. This tutorial is based on the main site, but other sites may be used as a source to copy events to your own site.
- Located to the right of the site selector are filters with a Year dropdown, Categories dropdown and Tags dropdown. Select the correct year from the dropdown if the desired year is not displayed and the screen will update.
- The filters limit the number of events displayed on the screen. Geographic areas are available in the Tags dropdown. Click the Tags dropdown and select the geographic area to display just events in that area. The screen will refresh
- Check the boxes in the Copy column for events you desire to import. Once the desired events have been checked, scroll to the bottom of the screen and click the blue Copy Events button. The screen will refresh. When the event list is updated, those events that were copied have the check boxes replaced with Copied and the copied event titles are prefaced with your boat name in blue.
- Review the list and if you see an event that you missed, check the box in the Copy column and click Copy Events.
- You are done importing the events. If you inadvertently imported an event that was not wanted, you may delete it as described in the subsequent section.
- Click the blue bar at the top of the page labeled Return to <boat name> Homepage.
The imported events have a number of items that the Skipper will probably want to change. Some of these item may be changed all at once (Boat location, Hiding Crew Lists, Limiting Crew Entry, Assigning or clearing Categories & Tags). These may also be changed on a per event basis along with other items (date / time changes, free form text in the description field). Should there be repeating events, they will be displayed with a salmon colored background. Repeating events should be edited in mass as much as possible before splitting to individual events. After recurring events have been split to individual events, each event must be edited separately.
- On the menu click on Calendar to display the Annual Calendar.
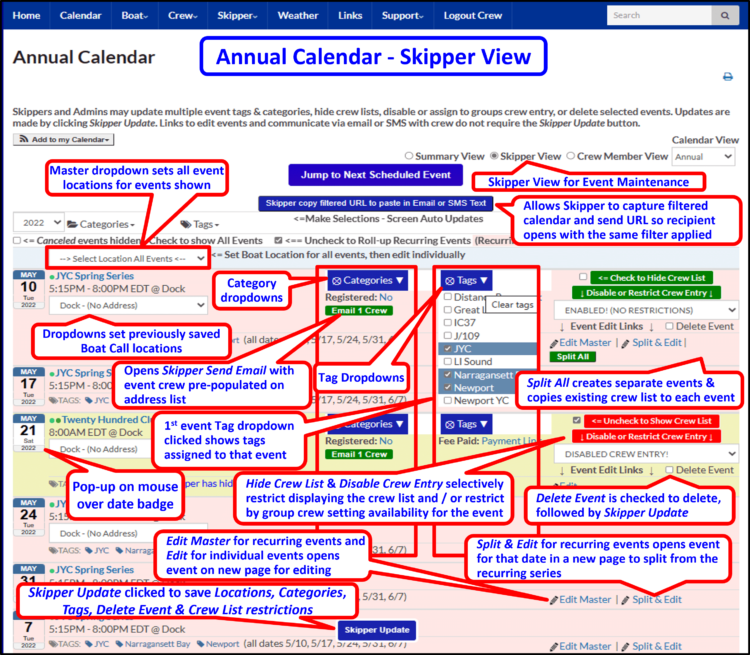
- Click on the Skipper View radio button located above the blue Jump to Next Scheduled Event button. The calendar will update to display each event in rows having a number of buttons, check boxes and dropdowns.
- Click the Year dropdown to select the desired year if it is not displayed
- If you imported events that were not desired, click the Delete Event checkbox located on the right side of the row where the event is displayed. Multiple events may be checked. Click the blue Skipper Update button located at the screen bottom center. The screen will refresh and the checked events deleted.
- Set the default location with Crew should meet for boat call. If most of the events use the same location you may click the master dropdown labeled --> Select Location All Events <--located in the gray bar above the calendar list and set the desired location for all events at once. If some events use a different location, scroll down and change each event dropdown as desired.
- Click the blue Skipper Update button located at the screen bottom center. The screen will refresh and the locations will be saved.
- There are check boxes and dropdowns available on the right of each event row that allow hiding crew lists and / or restricting crew entering availability. Change each event as desired
- Click the blue Skipper Update button located at the screen bottom center. The screen will refresh and the restriction will be saved.
- Categories & tags may be edited using the blue dropdowns for each event. Some tags imported with the events may not be desired (e.g. a tag for a one design class different than your boat, categories for rating classes not being raced such as ORC, IRC, etc.). Change each event as desired.
- Click the blue Skipper Update button located at the screen bottom center. The screen will refresh and the updated categories and tags will be saved.
- Should it be desired to edit the free form text, logs, or any other event information the event may be opened by clicking the Edit Master link for recurring events and Edit link for individual events. These links open the event edit page in a new browser window. Make any changes desired for the individual events in the separate windows. When completed editing each event click the blue Update button located in the Publish box in the right margin.
- Click Calendar on the menu to refresh the page to reflect the edited events
- The Crew is different on any of the days
- The time to be at the boat or location is different on any of the days so the associated email reminder is sent at different times.
- The event description text is different for any day (e.g. you may include text about post race activities that are different each day
- You want to modify any of the special fields for an event such as specify a different Uniform for each day (e.g. white shirts one day, blue shirts the next)
- Typically a weekly series would be split since it is likely there will be changes during the season
- Click Calendar on desktop menu
- Click the Skipper View radio button at the top, if not already selected. The display will refresh
- You may view recurring events expanded for all dates, or rolled up by unchecking the box labeled: <== Uncheck to Roll-up Recurring Events (Recurring Events Background) or Check the box labeled: <== Check to Expand Recurring Events
- After the screen refreshes there are options to Edit Master (allows editing all events with the same changes), Split & Edit (creates a copy of the master event for the selected date with edit screen), and green button labeled Split All (splits the entire series into separate events and copies the crew list from the first day to all days). Each of these button is an independent action and does NOT use the Skipper Update button.
- Click the green Split All for the first event you want to split. The screen will update showing the event on sperate dates.
- Repeat this action for all the events you want to split.
- Individual events may noy be edited as desired. Close that editing window once it has saved and repeat until you have edited all the desired events.
- Refresh the calendar and the separate events will display. Each event has its own crew list visible when mousing over the event data badge on the left.

Annual Calendar Skipper View - Used to Split Events

